Showing posts with label Helen Tilbury. Show all posts

Thursday, June 20, 2013

'Romance' Layout by Helen {My Final Project}


Hello there Purple Pumpkin fans!
Yes I am going to miss saying that 3 times a month LOL!!
This is my last post for Purple Pumpkin - thank you for having me :)

I have had a lot of fun here with my dear old friend Vicky Varvadouka  -
10 months all in all, if you include my initial GDT.  
But all good things must come to an end & I am moving on - 
please don't forget about me ladies!  
I hope that I have provided some inspiration to you during my time here!

You are most welcome to keep up with me on my blog HERE & come 
& play along at my challenge blog - Scrap Around The World - HERE.

Sam has very generously agreed to sponsor our 4th prize there
 for an entire year - THANK YOU SAM!!  


On with the show!  This is how I go about creating with Purple Pumpkin products. First I choose what products I am going to use.  I wanted to do a rainbow-type layout so I selected what I could find in my stash that would help me achieve an ombre/rainbow type look.


I had a photo in mind that I wanted to use & I printed it out in black & white as it was a mobile phone photo & not the best quality.  Doing this always 'saves' less than perfect photos.  I added a vintage hue to it to tie in with the yellow tones.


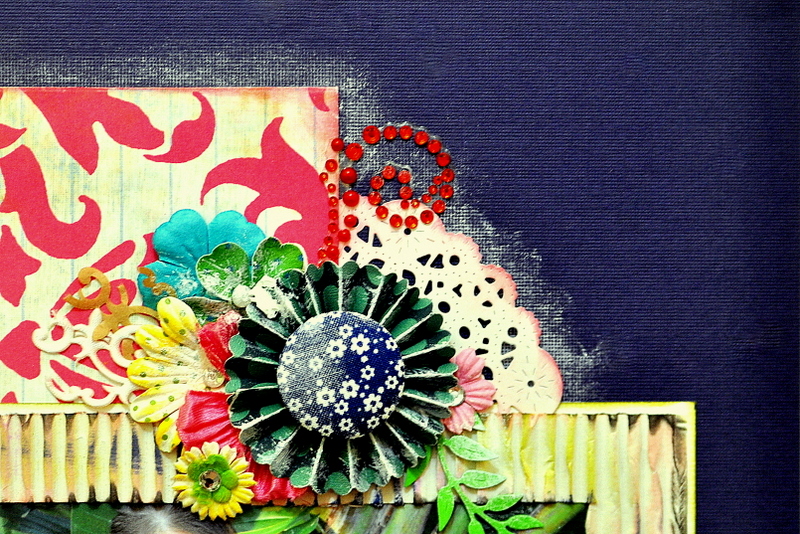
I began this layout by stamping with a Prima stamp around the perimeter of where I knew the photo would go (in the centre) then I used gel medium to apply some offcut strips of burlap (hessian) that I had leftover from a previous project.


Once that was stuck down I brushed over the burlap with gesso paste then added some watercolours around the edges of the burlap.  Then I flicked on some black mist, dried everything off with my heat gun, glued my entire page to a thin sheet of chipboard to flatten it out then added some white sponging of gesso around the edges of my page.


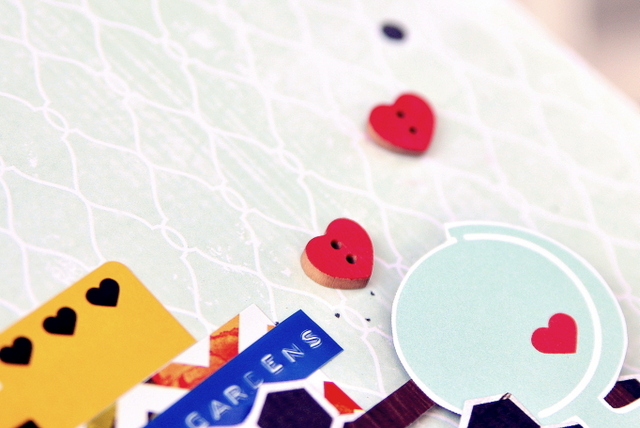
Lastly I positioned my Purple Pumpkin embellishments together with some chipboard words from Scrapmatts & some leftover bling dots from Flourish with a Bling.  As I wanted a muted layout I finished off by protecting my photo with a piece of acrylic plastic while giving my page a light spray of "Calico White" by Studio Calico (Mister Hueys).

All the items shown in my first supplies photograph can be found in the Purple Pumpkin online store HERE

 (Yoyo flowers, patterned fabric buttons in Large & XLarge, resin roses & flairs)
Miss you Already!


Saturday, June 15, 2013

An Off-The-Page Project by Helen Tilbury


Hi!  Well I hope to WOW you with this one!!  
One of my favourite Purple Pumpkin projects to date!!!


At Scrapmatts this month we got to construct & decorate this little
'Memory Cabinet'.  It arrived flat-packed & terrified the life out of me
 but came with detailed instructions & I managed to make it quite quickly!


I'm sending mine to a sweet online friend in America who brings sunshine
 into my life, so I decided to go with cheery yellows & oranges
 & used many little bits & pieces from Purple Pumpkin.


Here you can see that I used 2 XL fabric covered buttons & 2 regular sized ones available HERE. I also used a multi-coloured crochet flower tucked into the corner behind the heart button - you can buy that doily flower HERE & there are various different colour-ways to choose from.


In the othere side of the cabinet I used even MORE Purple Pumpkin goodies!

I used 2 jumbo fabric buttons in awesome floral designs, that I can't see in the store right now - I do hope they will come back though as they are really pretty! 

 I also used a yellow spotty button available HERE, a resin rose available HERE, and in the bottom section a cameo {not available at present} & a yoyo flower available HERE.


I also used quite a few wooden patterned buttons available HERE.

  If you are interested in seeing & reading more about this little project
of mine you can visit my blog at http://helentilbury.blogspot.com 
where I will have it up shortly with more close-ups, etc.

Purple Pumpkin supplies are perfect for using on Off-The-Page projects -
my only advice is to hot-glue the items on using a good glue-gun that
heats up really well, just be careful as they can burn you really badly!

The hot-glue is the strongest form of adhesive I've ever come across
{and the cheapest too!} so is perfect for things displayed out in the
open that are subject to more handling than our scrapbook pages.


Thursday, June 6, 2013

'Summer' Layout by Helen Tilbury


Hello again Purple Pumpkin fans!  
Helen here with a layout share that went up at Scrapmatts last month, 
where we were required to limit our colour palette to black, white & yellow.  


I used a couple of lovely yellow resin roses on this layout - see them there along the tear line?  They come in an assorted pack available HERE & are ever so handy.


I also used lots of little strips of yellow washi tape that I tore into strips.  I find that tearing makes the washi look more artistic on a layout like this & if you are worried about it lifting what I do is coat the whole area with a thin layer of gel medium applied with a thick paint-brush as that works as a sealer.


You can buy the washi tape HERE at a really reasonable cost & don't forget about the washi stacks too, where you get 3 co-ordinating rolls for $5 HERE.  If you want to see more close-ups or find out any more about my layout I'll have it up on my blog soon so come & visit if you like HERE!

Hope you get your washi on soon too!  Cheers!!


Friday, May 31, 2013

'This is Paradise' Layout by Helen Tilbury


Me again!  HELEN here!!  The last layout I'm sharing with you
 this month is one I created using this months sketch from Paperhaus.  


I used a couple of lovely neutral Purple Pumpkin elements in here,
can you spot them?  Firstly I used the suede flower to the left of
the layout, which I cut into 3/4 & 1/4 & used the smaller piece
down to the right under the fussy-cut flower stack.


Cutting your flowers is a great way to make your stash go further,
and if you are going to have them looking like they are coming
out from under something (like here where mine looks like it is
coming out from under the photo) you may aswell not waste any
part of it so rather cut it up & use your extra piece elsewhere!


Here you can see the music note button I used peeking out at
the top right.  I inked it up with brown ink & sponged some 
gesso on the top of it too.


Above you can see the smaller part of the suede flower peeking
out from under the other fussy-cut paper flowers.

I can't see this flower in the store at the moment but I did come
across these awesome fancy bling-centred flowers HERE -
I think those look pretty awesome!!  And you can buy the button
I used HERE.  That's a link to the exact XL one I used - I find 
them very handy for layering under things & adding dimension.

I have lots more close up & instructions up on my blog for this
layout if anyone is interested in how I created it & what I used.

Thanks for looking & I would love to know if any of you have
thought of cutting up your flowers too!  I hope you will try it!!


Tuesday, May 21, 2013

'Laugh' Layout by Helen Tilbury


Hello again!!  HELEN here sharing a layout that
 went up on the Sketchbook 365 blog recently!

Of course I had to make sure I 'snuck' some of my favourite
 Purple Pumpkin bits & pieces onto my page didn't I?!


Can you spot the Purple Pumpkin?
  It's quite subtle this time but it's there! 

 I've used some washi tape (the stripy stuff) in a few places. 
 I find that it looks best when you tear the end rather than cutting it. 
 Did you know there's a great deal on on WASHI at the moment? 
 Washi Stacks are only $5 for THREE - that's a steal!  
Head on over HERE & grab yours!!  
They are selling FAST!!!


These little tickets are great for adding an extra layer & look effective
 whether used singly or a few at a time.  Again they're a bargain
 at $1.50 for TWENTY!!  Go HERE...


I'm really HAPPY with the little "idea" I had here! 
 Using Purple Pumpkin twine to hand-stitch lines for hand journaling!  
I was wanting to incorporate the twine somewhere but with this cleaner style
 page a bow just didn't seem like the right way to go...then it hit me LOL!!


Again twine is another GREAT VALUE item available HERE
in the Purple Pumpkin store, at only $1.75 for 5 metres!!
  Tonnes of colours available too & I just love the subtle
 texture that it adds don't you?

Well that's it from me today ladies!
I was feeling a bit chatty but I will leave you now to get on 
with your Purple Pumpkin sketch - looking forward to seeing
 what you come up with this month - Cheers!!


Tuesday, May 14, 2013

'Lovely Memories' Layout by Helen Tilbury


Hi there Purple Pumpkin fans!  
HELEN here with a layout I created for the kit club I work for, that is sponsoring The Color Room this month, so I am Guest Designing there along with the rest of the My Creative Scrapbook team.  


We were given a specific colour palette to follow so I had to use Purple Pumpkin embellishments that were red/orange.  I used a red ribbon flower available here, then I layered an orange yoyo flower on top of it (available here), then grunged my 'new' flower up with a brown inkpad.


I also used some resin roses from Purple Pumpkin, available here.


I used 3 all in all (see the one above under the 'Memories' word?) 
& if you look at the main image I have used another one on top of the 'Lovely' word too.  

These resin roses are a great buy at only $1.50 for 10.  
They are very handy for 'sprinkling' around your layout 'confetti' style!

There are lots of nice new flowers in stock in the Purple Pumpkin store right now -
look HERE at all your options & think about layering them up like I've done here.

For more details on how I made this layout  see my blog post HERE.


Wednesday, May 1, 2013

Helen's take on the May Sketch!


Hi everyone!  Helen here with my sketch layout for May!  

Hope you like it :)


I have used tonnes of Purple Pumpkin tickets, 
a spotty button & a smaller fruity button :)

Please scroll DOWN to the previous post to see the layouts from the rest of the Design Team together with the Rules!  Happy May Day everyone!!


Wednesday, April 24, 2013

My Lovely Life! Layout by Helen Tilbury


Hi there Purple Pumpkin fans :-D  Hope this week is treating you well!  Helen HERE sharing my entry into the Once Upon a Sketch challenge this month, using lots of Purple Pumpkin product.


Can you spot all the goodies??  There are small, large & extra large covered buttons, a crochet doily flower, a resin flower (see top right), a ribbon flower (see centre), part of a craft tag & some twine


Can you see I had fun layering everything up?  I sure did!


When using your Purple Pumpkin fabric buttons a really cheap & easy thing you can do is repeat the circular shape with stamping.  Here I just dipped the core of a used tape roll into some brown ink to create the circle shape then added a bling dot to the edge of it. 


Up top there I used part of a craft tag - which I inked then doodled.


That lovely coral coloured resin rose comes from Purple Pumpkin too!


The gorgeous ribbon rose is another Purple Pumpkin superstar, sadly no longer available, but I have linked you up to some super fancy ribbon flowers that are similar.


If you take a look at my blog today I have a post going up with a lot more information on how I created my background so if you are interested in that please pop in HERE and say HI!


Tuesday, April 16, 2013

"Go Sharks" Layout by Helen Tilbury


Hi again Purple Pumpkin fans!  Helen here sharing my latest page with you - one I did especially for the challenge over at Challenge Me Happy - which currently is a sketch challenge.


I used some lovely bright pink tickets from the store HERE, as well as a bottle-top button & an XL spotty button.


I used papers from Dear Lizzy for American Crafts.  I love all the papers that Elizabeth Kartchner designs.  They are always bang on trend!


I used these black & white 'Flat' thickers as my page is about going to the rugby, and our local team is the Sharks (known all around the world I might add!!) & their colours are black & white!


I also used some small craft tags from the store HERE - they are so cute & great for layering up here & there.  I was testing a white pen on black cardstock so I cut out my scribble & used it as an embellishment :)


I used some Heidi Swapp mistable banners which I inked in black for another black & white embellishment.  I hope you've enjoyed taking a peek at my page. 

Wishing you all a wonderful week!

I do hope that it contains some Purple Pumpkin Happiness!!


Tuesday, April 9, 2013

'Precious' Layout by Helen Tilbury


Hello ladies!  Helen HERE, sharing my first page for my new term
at Purple Pumpkin. I am so happy to be here for another
6 months - woooooooo!!  Here's my latest creation for you!  


I made this layout for the sketch challenge at The Scrapbook Store, using loads of Purple Pumpkin loveliness as usual :)  The navy spotty buttons, the denim flower, the XL rose button, the crochet flower, 2 cameos, resin flower & ticket offcut, as well as the felt die-cut circle from a Limited Edition Kit.


I used a dark background as I love the striking look that it creates 
& went for a zingy navy, lime green & shocking pink colour scheme.


My white acrylic paint was basically finished so, rather than throwing it away,
 I cut the tube open & dry brushed around the edges of my central elements,
  thus creating a vignette effect on my page.


I also dry-brushed over many of my embellishments & love the look 
that this created!  I used 3D glue dots under the petals of the denim
 flower to give it some chunky dimension.


I made a frame for my photo using the free corrugated tissue-wrap that comes 
on the top of biscuits in a large tin.  I inked it up in several different colours 
first & cut out the centre so I could place the photo behind the frame 
(that way the photo would remain flat rather than becoming
 wavy when placed on top of the corrugated paper).


I used up some of my older Prima flowers here too & added a couple of 
die-cut shapes (the concertina flower & the olive leaf).  I have a whole tub
 of them ready to use from when I went on a die-cutting frenzy :)  

Thanks for checking out my page!
I would ♥ it if you LIKED my new Facebook page HERE too :)

Have you ever thought about altering your Purple Pumpkin products with paint?
Why don't you give it a go?!  
The randomly dry-brushed 'gesso' look is really trendy right now!


Thursday, March 21, 2013

'Bali Memories' by Helen Tilbury


Hi ladies!  Hope you are well!!  We have a public holiday today in South Africa, where I live, so I am soooo happy about that!!!  I am going to spend some of my day scrapping of course!  Today I am sharing a layout with you that I created using the latest sketch at Get Creative.  


I used all sorts of things from Purple Pumpkin on this page, namely the yoyo flower, wooden buttons, fabric buttons, twine, crochet flower & doily.  Hmmm, that's quite a lot isn't it?!


I'm so into yellow at the moment I don't know what to do with myself!  Everything I touch ends up swiped with my yellow inkpad!!  Above you can see a wooden Purple Pumpkin button that I have done just that to!  You can buy them HERE & recolour them to whatever colour you like (psst...I suggest yellow!)


As you can see I used a lot of twine too.  Rather than structured swirls I twisted the twine & let it drop into organic ones instead.  ♥♥♥ !!!  Buy your twine HERE - it's cheap & something with a million uses.  If it ever goes out of fashion in scrapbooking I'll be wrapping my gifts in it :)


The glittery bits you can see on the wooden buttons are Distress Stickles that I added once my inking was dry (just use a heat gun to speed up the process!) & don't worry about the print on the buttons - if you want to paint some up just flip them over & use the plain side!


See the pearl button above?  I took that off the yoyo flower & replaced it with a fabric button instead.  Of course I wasn't going to waste the pearl centre though so there it is!  Buy your patterned fabric buttons in the store HERE.  I don't see the yoyo flowers in stock right now but don't forget about the SALE coming up tomorrow - you may see some there!


Fabric button & twine!  Two very simple "staples" that look good with everything if you ask me!  Well I hope you enjoyed my page today.  It will be up on my blog some time next week. 

Don't forget about the Purple Pumpkin Design Team call as you only have a few days to get your applications in - I hope you try out!!

 If you haven't entered the giveaway on my blog I would love for you to join in - see it on my blog here!


Wednesday, March 13, 2013

'The Adventure Begins' by Helen Tilbury


Hello there Purple Pumpkin fans!  HELEN here again today, sharing a layout with you that I have just created for the current challenge over at Once Upon a Sketch.  The theme is WEEKENDS & I turned the sketch on it's side to accomodate my landscape photo orientation.


I used the new Glitz Design 'Color Me Happy' papers as I am a fan of bright colours & this is really one HAPPY collection!  I have used tonnes of Purple Pumpkin goodies on this one.  Can you spot them all?!?  


Instead of masking I used this fantastic hexagon paper from Glitz Design Cashmere Dame collection.  My trusty dymo was used for some of my journaling.  I have 2 dymos, each slightly different, as you can see by the bigger & smaller fonts above.  You can JUST see that happy yellow XL button peeking out from under the photo there.  Buy that HERE.  


I LOVED layering things up as you can see!  And of course I added in a couple of tickets on each side of my cluster.  They are available from Purple Pumpkin HERE.  See that printed button by the date sticker?  You can purchase that one HERE.  


There's another fabric button tucked underneath the title, see?  And there are also a few wooden hearts dotted around my page (I simply recoloured them using a red inkpad first).  There is also a large printed wooden button up on the left by the location cutout. 


Those Purple Pumpkin hearts echoed the hearts in the paper collection so well as you can see.


Why not try to find a patterned paper in your own stash that you can cut out in this way?  It was FUN let me tell you!!


I fussy-cut my title from a sheet of patterned paper from the same collection {Glitz Design Color Me Happy} & used one of their cardstock stickers for my journaling.  


I hope you enjoyed taking a peek at my new creation today!
Don't forget that there is a DESIGN TEAM CALL at Purple Pumpkin right now & we would LOVE to see some of you apply.  ALL of you in fact!!

I have a BIG GIVEAWAY going on right now over at my personal blog HERE and I would love it if you came & paid me a bloggy visit & signed up.  Got to be in it to win it!!

Happy Hump Day everyone :)